Master the Ultimate Juicy Cheeseburger: Your Guide to Homemade Perfection
Are you tired of bland, dry patties and lackluster buns? What if I told you that crafting the ultimate juicy Cheeseburger at home isn’t just possible, but incredibly rewarding and surprisingly simple? Forget the drive-thru; mastering this culinary classic in your own kitchen offers unparalleled flavor, complete control over ingredients, and a truly personalized dining experience. From selecting the perfect ground beef to achieving that ideal melty cheese, this comprehensive guide will transform your homemade Hamburger from ordinary to extraordinary. Let’s dive into creating a burger that will impress even the most discerning palates.
Ingredients & Kitchen Tools
Gathering the right components is the first step towards a magnificent burger.
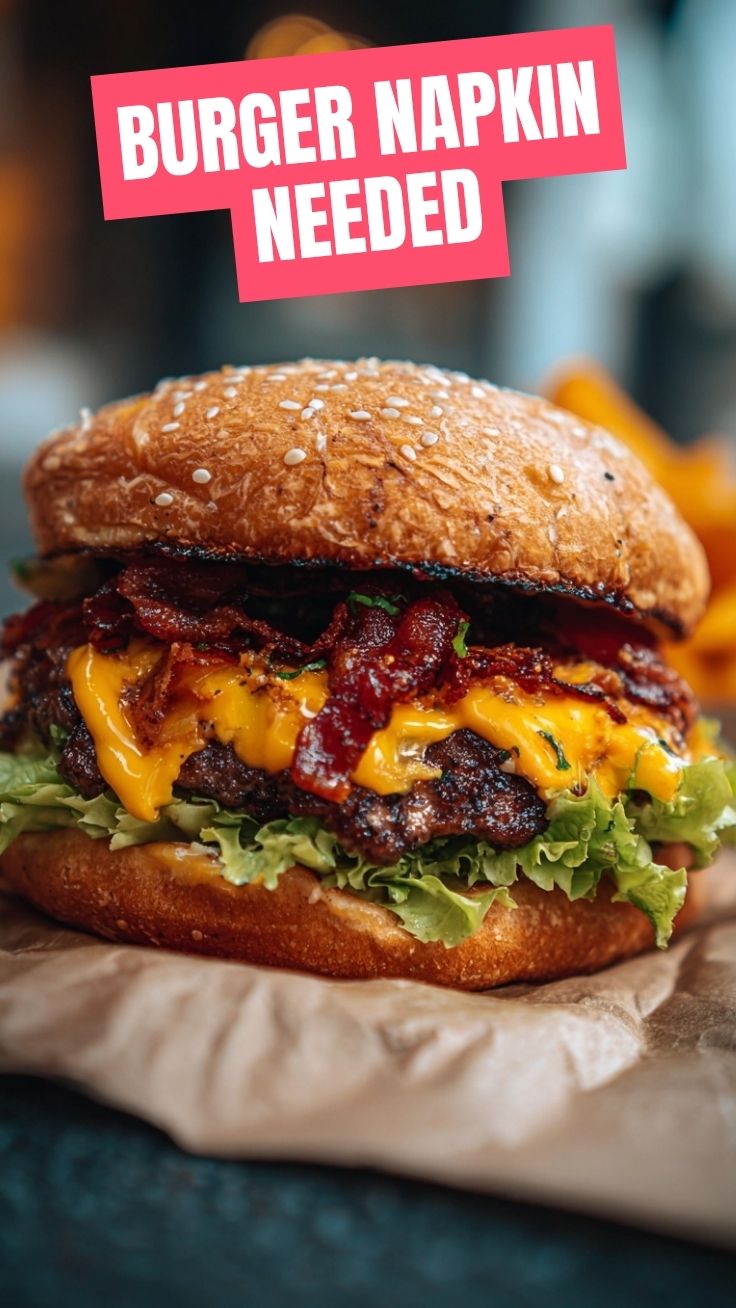
- 1.5 lbs Ground Chuck (80/20 lean-to-fat ratio): This blend ensures maximum juiciness and flavor. Avoid leaner options for a truly satisfying Cheeseburger.
- 4-6 slices of Cheese (Cheddar, American, Swiss, or Provolone): Choose a cheese that melts beautifully.
- 4-6 Burger Buns (Brioche, Potato, or Sesame Seed): Fresh, sturdy buns are crucial to hold all the deliciousness.
- 1 tbsp Worcestershire Sauce: Adds a deep, umami flavor to the patty.
- 1 tsp Garlic Powder: Enhances the savory notes.
- 1 tsp Onion Powder: Aromatic depth.
- Salt and Freshly Ground Black Pepper: Season generously to taste.
- Optional Toppings: Lettuce leaves, sliced tomatoes, red onion rings, pickles, bacon, ketchup, mustard, mayonnaise.
- Cooking Oil (Vegetable, Canola, or Grapeseed): For searing your patties.
Kitchen Tools:
- Large Mixing Bowl: For combining ground beef and seasonings.
- Grill Press or Heavy Spatula: Helps achieve a delicious crust on your patty.
- Meat Thermometer: For ensuring safe internal cooking temperatures.
- Large Skillet or Cast Iron Pan: Ideal for stovetop searing.
- Grill (Optional): For a smoky flavor.
- Spatula: For flipping.
- Baking Sheet with Wire Rack: For resting cooked burgers.
Prep Time & Cooking Schedule
- Prep Time: 15 minutes
- Cook Time: 10-15 minutes
- Resting Time: 5 minutes
- Total Time: Approximately 30-35 minutes
This recipe is perfect for a quick weeknight dinner or a weekend gathering. Start preparing your patties about 20 minutes before you plan to eat, giving yourself ample time to sear, melt, and assemble.
Step-by-Step Instructions
Follow these clear steps for a succulent Cheeseburger every time.
1. Prepare the Patties: In a large mixing bowl, gently combine the ground chuck, Worcestershire sauce, garlic powder, onion powder, salt, and pepper. Avoid overmixing, as this can lead to a tough patty. Form the mixture into 4-6 evenly sized patties, about ¾-inch thick. Create a slight indentation in the center of each patty with your thumb; this prevents them from bulging in the middle during cooking. For a truly exceptional Hamburger, ensure your patties are consistently sized.
2. Preheat & Sear: Heat a large skillet or cast iron pan over medium-high heat. Add a tablespoon of cooking oil. Once shimmering, carefully place your patties in the hot pan, ensuring not to overcrowd. For best results, sear in batches if necessary.
3. Cook to Perfection: Cook for 3-5 minutes per side for medium-rare, 5-7 minutes per side for medium-well, or until desired doneness is reached. For that perfect crust, resist the urge to constantly flip. Use a meat thermometer to ensure an internal temperature of 160°F (71°C) for food safety.
4. Melt the Cheese: During the last minute of cooking, place a slice of cheese on top of each patty. You can cover the pan with a lid or use a metal bowl to help the cheese melt quickly and evenly.
5. Toast the Buns: While the patties cook, lightly toast your burger buns on a separate pan or under the broiler until golden brown. This adds texture and prevents the bun from becoming soggy.
6. Assemble: Transfer the cooked, cheesy patties to a plate and let them rest for 5 minutes. This allows the juices to redistribute, ensuring a more tender and flavorful burger. Then, assemble your delicious Cheeseburger with your toasted buns and desired toppings.
Nutritional Benefits & Advantages
A homemade burger, especially one prepared with care, can offer several benefits. Choosing 80/20 ground chuck provides essential protein for muscle repair and satiety. Beef is also a good source of iron, zinc, and B vitamins. By making your own, you control the amount of salt and fat, avoiding the excessive sodium and additives often found in fast-food alternatives. Adding fresh vegetables like lettuce and tomato boosts fiber and vitamin content, making it a more balanced meal.
Tips, Variations & Cooking Advice
- Flavor Boost: Mix in finely chopped onions, jalapeños, or a pinch of smoked paprika with the ground beef for extra flavor.
- Alternative Cooking Methods: For a smoky essence, grill your burgers over charcoal or gas. Flatten them out more for “smash burgers” which develop an incredible crisp crust.
- Dietary Adaptations: For a gluten-free option, use gluten-free buns or serve your Cheeseburger in a lettuce wrap. Dairy-free cheese alternatives are widely available for those with lactose intolerance.
- Patty Size: For thicker patties, increase the cooking time slightly. For thinner patties, decrease it. Always use a meat thermometer.
Common Mistakes to Avoid
- Overmixing the Meat: This is the cardinal sin of burger making! Overworked meat results in a tough, dense patty. Mix just until combined.
- Pressing Patties During Cooking: Don’t press down on your patties with a spatula while searing. This squeezes out all the delicious juices, leading to a dry Hamburger.
- Not Seasoning Enough: Bland meat equals a bland burger. Be generous with salt and pepper.
- Cold Buns: Untoasted, cold buns can detract from the overall experience. Always toast them!
Storage & Meal Prep Tips
Cooked burger patties can be stored in an airtight container in the refrigerator for 3-4 days. For longer storage, cooked patties can be frozen for up to 3 months. Let them cool completely before wrapping individually in plastic wrap and then placing in a freezer-safe bag or container. Reheat gently in a skillet over low heat or in the oven at 300°F (150°C) until warmed through, being careful not to dry them out. For meal prepping, you can form patties ahead of time and store them in the fridge for up to 24 hours before cooking.
Conclusion
Crafting the perfect homemade Cheeseburger is an incredibly rewarding experience that elevates a simple meal into a culinary triumph. By following these detailed steps, from selecting the right meat to mastering the sear, you’re well on your way to creating a juicy, flavorful burger that surpasses any restaurant offering. Don’t be intimidated; with a little practice, your homemade Hamburger will become a go-to favorite. Give this recipe a try, share your delicious results, and embark on your journey to burger perfection!
FAQs
- Q: Can I use leaner ground beef?
A: While 80/20 chuck is recommended for maximum flavor and juiciness, you can use leaner beef (e.g., 90/10) but be mindful that the burger may be drier. Consider adding a tablespoon of shredded butter to the mixture for moisture.
- Q: What’s the best way to prevent the patties from shrinking?
A: The thumb indentation in the center helps significantly. Also, avoiding overmixing and not pressing the patties during cooking will minimize shrinkage.
- Q: How do I get a good sear without burning?
A: Ensure your pan is hot but not smoking, use a medium-high heat setting, and don’t overcrowd the pan. A cast iron skillet is excellent for achieving a perfect crust.
- Q: What are some kid-friendly topping ideas?
A: Classic ketchup and mustard work well. Try mild cheese like American, and maybe some finely shredded lettuce or a sweet pickle relish.
- Q: Can I bake these burgers instead of pan-frying or grilling?
A: Yes! Bake patties on a wire rack over a baking sheet at 375°F (190°C) for 20-25 minutes, flipping halfway. Add cheese in the last few minutes. While it works, you won’t get the same delicious crust as pan-frying or grilling.
Quick way to grow a perfect Cheeseburger plant
Ingredients
Equipment
Method
- Prepare your garden bed by splitting the sesame seed bun and placing the bottom half on a plate.
- Plant your main seed, the ground beef patty, firmly on the bun base.
- Allow a cheddar cheese slice to blossom atop the patty, creating a cheesy bloom.
- Add nutrient-rich layers of fresh lettuce, vibrant tomato, and zesty onion slices.
- Scatter pickle slices like spring dew for a delightful crunch.
- Finish your burger plant by drizzling ketchup and mustard as "rain," then cover with the top bun.