The Ultimate Guide to Perfectly Blackened Chicken at Home
Have you ever wondered why restaurant-quality blackened chicken has that irresistible crust and juicy interior, while your attempts at home often end up dry or burnt? The secret lies in mastering the technique and using the right spice blend. Preparing this Blackened Chicken recipe at home not only saves money but also gives you complete control over the ingredients, ensuring a healthier, more flavorful meal every time. In this comprehensive guide, we’ll walk you through every detail, from selecting the perfect cut of chicken to achieving that signature char without smoke filling your kitchen. Get ready to impress your family with a dish that tastes like it came straight from New Orleans.
Ingredients & Kitchen Tools
For the Chicken
– 4 boneless, skinless chicken breasts (6-8 oz each) – Look for uniform thickness for even cooking. You can substitute with chicken thighs for juicier results.
– 2 tablespoons unsalted butter – Essential for that rich flavor and golden crust. Use ghee for a dairy-free option.
– 1 tablespoon avocado oil – High smoke point prevents burning. Can swap for canola or grapeseed oil.
– 1 teaspoon kosher salt – Use coarse salt for better texture. Reduce to ½ teaspoon if sensitive to sodium.
For the Blackened Seasoning
– 1 tablespoon paprika – Sweet or smoked paprika adds depth. Hungarian paprika works beautifully.
– 1 teaspoon onion powder – Balances the heat. Can use granulated onion.
– 1 teaspoon garlic powder – Use fresh minced garlic only if cooking at lower heat.
– 1 teaspoon dried thyme – Offers earthy notes. Substitute with ½ teaspoon dried oregano.
– ½ teaspoon cayenne pepper – Adjust to ¼ teaspoon for milder flavor. Omit for a kid-friendly version.
– ½ teaspoon black pepper – Freshly ground provides best aroma.
– ¼ teaspoon white pepper – Adds subtle heat without color. Omit if unavailable.
Kitchen Tools
– Cast-iron skillet – Ideal for even heat distribution and crust formation. No cast-iron? Use heavy-bottomed stainless steel.
– Paper towels – Essential for drying chicken thoroughly.
– Tongs – Flip chicken without piercing the meat.
– Instant-read thermometer – Makes perfect doneness foolproof.
– Small bowl – For mixing your seasoning blend.
Prep Time & Cooking Schedule
– Prep Time: 10 minutes (seasoning + patting dry)
– Cook Time: 12–15 minutes (6–8 minutes per side)
– Resting Time: 5 minutes (crucial for juice retention)
– Total Time: Approximately 30 minutes
Pro Planning Tip: Remove chicken from refrigerator 15 minutes before cooking to reduce temperature shock. While chicken rests, prepare your sides – this dish pairs beautifully with rice or roasted vegetables.
Step-by-Step Instructions
Step 1: Prepare Your Seasoning
In a small bowl, combine paprika, onion powder, garlic powder, dried thyme, cayenne pepper, black pepper, and white pepper. Mix thoroughly. This Blackened Seasoning blend can be stored in an airtight container for up to 1 month – double or triple the recipe for future use.
Step 2: Prep the Chicken
Pat each chicken breast completely dry with paper towels. Moisture is the enemy of a good crust! Season both sides generously with kosher salt first, then apply the blackened seasoning mixture, pressing it firmly into the meat. Allow to rest for 5 minutes.
Step 3: Heat Your Skillet
Place a cast-iron skillet over medium-high heat for 3–4 minutes. Test by flicking a drop of water – it should sizzle and evaporate immediately. Add avocado oil and swirl to coat. The oil should shimmer but not smoke.
Step 4: Sear with Butter
Reduce heat to medium. Swirl in 1 tablespoon of butter, letting it melt and foam. Carefully place seasoned chicken breasts in the skillet, leaving space between pieces (cook in batches if needed). Cook undisturbed for 6 minutes for a perfect crust. The seasoning will turn deep mahogany.
Step 5: Flip and Finish
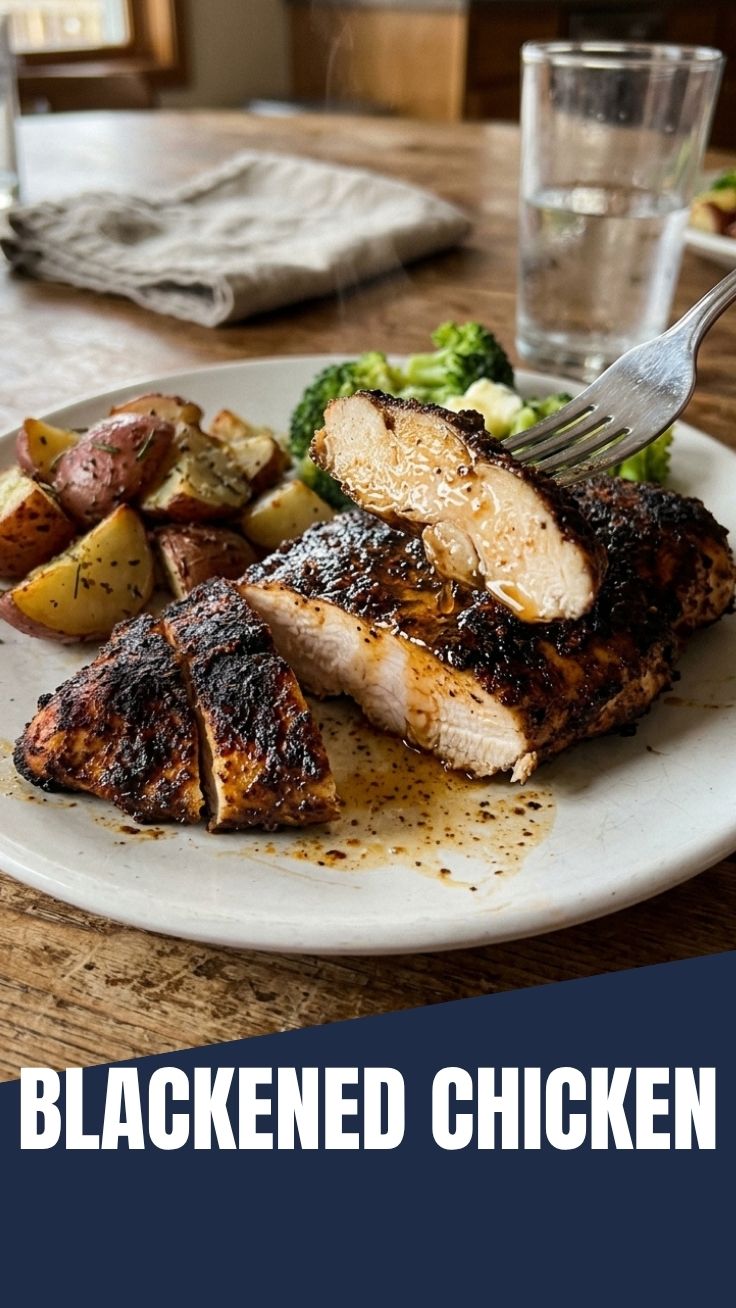
Using tongs, flip each piece. Add remaining butter to the pan and tilt to baste. Cook another 6–7 minutes until internal temperature reaches 160°F (carry-over cooking will bring it to 165°F). Remove from heat and let rest for 5 minutes before slicing. This Blackened Chicken is perfectly cooked when the exterior is dark and crusty while the inside remains juicy.
Nutritional Benefits & Advantages
This homemade blackened chicken offers impressive nutritional value with approximately 285 calories, 35g protein, and only 8g carbohydrates per serving (using chicken breast and minimal oil). Key advantages include:
– High-quality lean protein supports muscle repair and satiety
– Paprika and cayenne contain capsaicin, which may boost metabolism
– Garlic and onion provide prebiotic fiber for gut health
– Butter provides fat-soluble vitamins A, D, E, and K
– No refined sugars – unlike many restaurant versions that add sugar to the rub
Compared to takeout, homemade blackened chicken contains up to 60% less sodium and zero preservatives. For a lower-fat version, use cooking spray instead of butter, though you’ll sacrifice some crust flavor.
Tips Variations & Cooking Advice
Flavor Variations:
– Creole Style: Add ½ teaspoon dried oregano and ¼ teaspoon dried basil to seasoning
– Lemon Herb: Mix 1 teaspoon dried lemon zest into seasoning
– Smoky Chipotle: Replace cayenne with ½ teaspoon smoked paprika and ¼ teaspoon chipotle powder
Cooking Methods:
– Grill: Cook over high direct heat (450°F) for 5–6 minutes per side
– Oven: Sear in skillet 3 minutes per side, then finish at 400°F for 10–12 minutes
– Air Fryer: Cook at 375°F for 12–14 minutes, flipping halfway
Dietary Adaptations:
– Dairy-Free: Replace butter with avocado oil or vegan butter
– Gluten-Free: This recipe is naturally gluten-free – the seasoning contains no wheat
– Low-Sodium: Use salt-free seasoning blend and add salt only at serving
Pro Tip: For extra crispy crust, place seasoned chicken on a wire rack in the refrigerator uncovered for 1 hour before cooking – this dries the surface completely.
Common Mistakes to Avoid
1. Using Wet Chicken – Skipping the drying step creates steam, preventing crust formation. Solution: Pat chicken with multiple paper towels until surface feels tacky.
2. Overcrowding the Pan – Crowded pans lower temperature and cause steaming. Solution: Cook in batches of 2 maximum, keeping finished pieces warm at 200°F in the oven.
3. Insufficient Heat – Low heat won’t develop the dark crust. Solution: Ensure skillet is properly preheated and maintain medium heat throughout.
4. Skipping the Rest – Cutting chicken immediately causes juices to flood the plate. Solution: Rest for exactly 5 minutes – use this time to deglaze pan with broth for a quick sauce.
5. Burning the Butter – Butter solids burn easily. Solution: Start with oil, then add butter just before adding chicken, or use clarified butter (ghee).
Storage & Meal Prep Tips
Refrigeration (3–4 days):
– Cool completely before storing in an airtight container
– Place paper towel in container to absorb excess moisture
– Slice chicken before storing for quick meal assembly
– Do not store with sauces or vegetables – keep separate
Freezing (up to 3 months):
– Wrap each cooked breast individually in plastic wrap
– Place wrapped chicken in freezer-safe bag, removing air
– Label with date and “use by” month
– Defrost overnight in refrigerator
Reheating (maintain texture):
– Best: Reheat in a 350°F oven for 10–12 minutes
– Quick: Air fry at 350°F for 5–6 minutes
– Avoid: Microwave – it makes the crust soggy
– Pro Tip: For reheated chicken, slice thinly and add to salads or wraps – texture matters less
Conclusion
Mastering this Blackened Chicken recipe transforms a simple weeknight dinner into a restaurant-quality experience. The key takeaways: dry your chicken thoroughly, preheat your cast-iron properly, and don’t rush the sear. With the Blackened Seasoning prepared once and stored for future meals, you have a versatile spice blend ready for fish, pork, or roasted vegetables. This dish proves that bold, complex flavors can come from your home kitchen in under 30 minutes. Now it’s your turn – fire up that skillet, get that crust perfect, and share your results in the comments below! For more Southern-inspired recipes, check our chicken and rice category.
FAQs
1. Can I use chicken thighs instead of breasts?
Yes! Bone-in thighs work wonderfully – adjust cooking time to 8–10 minutes per side or until internal temperature reaches 175°F. The extra fat keeps them incredibly moist.
2. Why is my blackened chicken bitter?
Bitterness usually comes from burnt spices. Ensure your pan isn’t too hot (medium heat is perfect) and don’t overcrowd. If seasoning smokes excessively, reduce heat immediately.
3. How can I make this less spicy for kids?
Simply reduce cayenne to ¼ teaspoon or omit entirely. Add ½ teaspoon smoked paprika for color without heat. The rest of the seasoning remains flavorful.
4. Can I make the seasoning in advance?
Absolutely! Store your Blackened Seasoning in an airtight jar in a cool, dark place for up to 1 month. Shake before each use to redistribute oils from paprika.
5. What sides pair well with blackened chicken?
Creamy grits, roasted vegetables (especially asparagus or zucchini), cilantro lime rice, or a crisp coleslaw with apple cider vinegar dressing all complement the bold flavors perfectly.
Quick way to grow: 3 Blackened Chicken
Ingredients
Equipment
Method
- Pat the chicken breasts dry with paper towels to ensure a crispy crust.
- Season both sides of each chicken breast generously with blackening seasoning.
- Heat olive oil in a large cast-iron skillet over medium-high heat until it shimmers and is almost smoking.
- Carefully place the chicken breasts in the hot skillet, ensuring not to overcrowd the pan.
- Cook for 4-6 minutes per side, or until a dark, crusty sear forms and the chicken is cooked through to an internal temperature of 165°F (74°C).
- Remove the chicken from the skillet and let it rest for a few minutes before slicing or serving.