Unlock Flavor & Health: Your Ultimate Guide to Perfect Cauliflower Fried Rice
Ever wondered how to transform a humble vegetable into a culinary masterpiece that’s both incredibly delicious and genuinely good for you? Look no further than Cauliflower Fried Rice! This isn’t just another side dish; it’s a versatile, flavor-packed meal that caters to a myriad of dietary needs, making it a valuable addition to any home cook’s repertoire. Preparing this innovative take on a classic at home empowers you to control ingredients, customize flavors, and enjoy a fresh, vibrant dish that outshines any takeout. For those exploring healthier dining options or simply seeking inventive ways to incorporate more vegetables, mastering keto cauliflower recipes like this one is a game-changer. Let’s dive in and discover how to create a sensational, guilt-free feast.
Ingredients & Kitchen Tools
To embark on your Cauliflower Fried Rice adventure, gather these essentials:
- 1 medium head of cauliflower: The star! Choose a firm, white head. This will be riced.
- 2 tablespoons sesame oil: For that authentic, nutty fried rice aroma.
- 1 tablespoon olive oil (or avocado oil): A neutral oil for general sautéing.
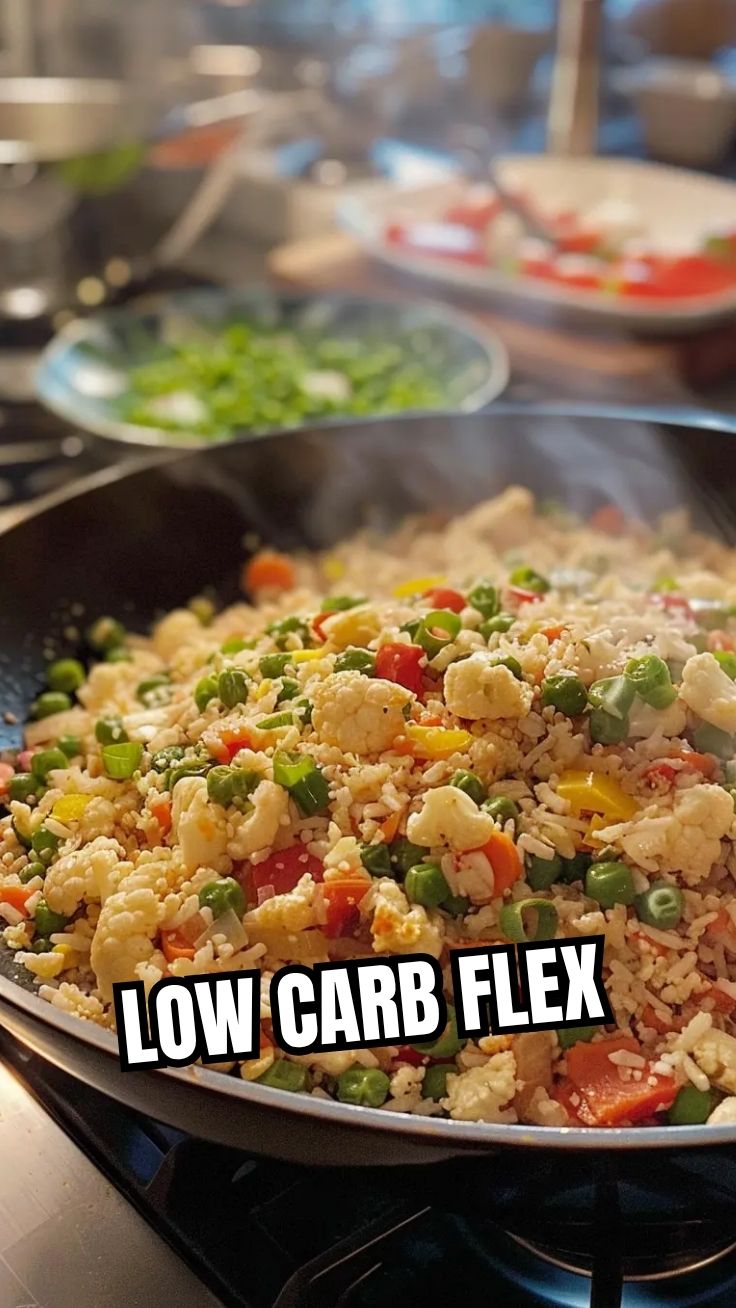
- 1 cup mixed frozen vegetables: Peas, carrots, corn are classic. (e.g., Bird’s Eye mixed veggies). Convenient and colorful.
- 1/2 cup diced yellow onion: Aromatic base, adds sweetness.
- 2 cloves garlic, minced: Essential for depth of flavor.
- 1 tablespoon fresh ginger, grated: Pungent and invigorating, a fried rice hallmark.
- 2 large eggs: For scrambled egg bits, a classic fried rice component.
- 3 tablespoons low-sodium soy sauce (or tamari for gluten-free): Umami and seasoning.
- 1 tablespoon rice vinegar: Adds a bright, tangy lift.
- 1 teaspoon Sriracha (optional): For a touch of heat.
- Green onions, sliced: For garnish and a mild oniony bite.
- Toasted sesame seeds: For garnish and texture.
Kitchen Tools:
- Large skillet or wok: Essential for even cooking and proper “frying” of the rice.
- Food processor (with grating attachment) or box grater: For ricing the cauliflower efficiently.
- Sharp knife and cutting board: For prepping vegetables.
- Spatula: For stirring and scrambling.
- Measuring cups and spoons: For precise ingredient amounts.
Prep Time & Cooking Schedule
- Prep Time: 15-20 minutes (includes ricing cauliflower, chopping veggies).
- Cook Time: 15-20 minutes.
- Total Time: 30-40 minutes.
This recipe is designed for quick assembly, making it perfect for weeknight dinners. The key is to have all your ingredients prepped and ready before you start cooking, as fried rice cooking is a fast-paced process.
Step-by-Step Instructions
1. Rice the Cauliflower: Wash and thoroughly dry the cauliflower head. Remove the core and dark green leaves. Cut the florets into manageable pieces. Pulse them in a food processor in batches until they resemble rice grains. Alternatively, use a box grater. Set aside.
2. Sauté Aromatics: Heat the sesame oil and olive oil in your large skillet or wok over medium-high heat. Add the diced onion and cook until softened and translucent, about 3-4 minutes.
3. Add Ginger & Garlic: Stir in the minced garlic and grated ginger. Cook for another minute until fragrant, being careful not to burn the garlic.
4. Cook Veggies: Add the frozen mixed vegetables to the pan. Sauté for 5-7 minutes, until they are tender-crisp. Push all ingredients to one side of the pan.
5. Scramble Eggs: Crack the two eggs into the empty side of the pan. Scramble them quickly with your spatula until just set. Once cooked, break them into smaller pieces and mix them with the other ingredients.
6. Add Cauliflower “Rice” & Sauce: Add the riced cauliflower to the pan. Pour in the soy sauce, rice vinegar, and Sriracha (if using). Increase heat to high.
7. “Fry” the Rice: Stir-fry vigorously for 5-8 minutes. The goal is to evaporate excess moisture from the cauliflower and allow it to get slightly browned and tender-crisp, mimicking regular fried rice. This step is crucial for achieving the perfect texture for your Cauliflower Fried Rice.
8. Serve & Garnish: Remove from heat. Garnish generously with sliced green onions and toasted sesame seeds. Enjoy immediately! This dish is a superb example of versatile keto cauliflower recipes.
Nutritional Benefits & Advantages
Cauliflower Fried Rice is a nutritional powerhouse! Cauliflower is low in calories, high in fiber, and packed with essential vitamins and minerals, including Vitamin C, K, and folate. Swapping traditional rice for cauliflower dramatically reduces the carbohydrate count, making it an excellent choice for those on ketogenic, low-carb, or diabetic-friendly diets. The fiber promotes digestive health and satiety, while the colorful array of vegetables adds a spectrum of phytonutrients and antioxidants. Plus, it’s a smart way to sneak more veggies into your diet in a deliciously disguised form.
Tips, Variations & Cooking Advice
- Dry Cauliflower is Key: Ensure your cauliflower “rice” is as dry as possible after processing. Excess moisture will steam the cauliflower instead of frying it, leading to a mushy texture. You can pat it with a paper towel.
- Protein Boost: Add cooked chicken, shrimp, tofu, or tempeh for a more substantial meal. Sauté these proteins first, remove from the pan, then add back in at step 7.
- Flavor Variations:
* Spicy Kick: Increase Sriracha or add red pepper flakes.
* Umami Bomb: A teaspoon of mushroom powder or a dash of fish sauce can enhance depth.
* Sweet & Tangy: Add a teaspoon of honey or maple syrup along with the soy sauce.
- Spice it up: Consider a pinch of five-spice powder for an aromatic twist.
- Dairy-Free/Vegan: Omit the eggs or use a plant-based egg substitute. Ensure your soy sauce is tamari for gluten-free.
Common Mistakes to Avoid
- Overcrowding the Pan: This is a top mistake! Cook in batches if necessary. An overcrowded pan lowers the temperature, leading to steamed, watery cauliflower instead of fried.
- Not Drying the Cauliflower: As mentioned, wet cauliflower will not “fry” properly.
- Overcooking the Cauliflower: Riced cauliflower cooks quickly. Overcooking will make it mushy. Aim for tender-crisp.
- Skipping the High Heat: Fried rice needs high heat to get those slightly browned, flavorful bits. Don’t be afraid to crank up the stove.
- Under-Seasoning: Taste and adjust! Fried rice benefits from bold flavors.
Storage & Meal Prep Tips
Cauliflower Fried Rice is excellent for meal prep!
- Refrigeration: Store cooled leftovers in an airtight container in the refrigerator for up to 3-4 days.
- Freezing: While possible, the texture of riced cauliflower can become softer upon thawing. If freezing, cool completely, then store in freezer-safe containers for up to 1 month. Thaw in the refrigerator overnight before reheating.
- Reheating: Reheat in a skillet over medium heat with a tiny bit of oil, stirring frequently, until heated through. You can also microwave, but the skillet method helps maintain texture.
Conclusion
There you have it – a comprehensive guide to crafting the most delicious and satisfying Cauliflower Fried Rice right in your own kitchen! This recipe is not just a healthy alternative; it’s a vibrant, flavorful dish in its own right, showcasing the incredible versatility of this superfood. By embracing keto cauliflower recipes like this, you unlock a world of healthy eating that never compromises on taste. So, gather your ingredients, fire up your wok, and prepare to be amazed by this fantastic, guilt-free meal. Give it a try, experiment with your favorite additions, and share your culinary creations with us!
FAQs
Q1: Can I use pre-riced cauliflower?
A1: Absolutely! Pre-riced cauliflower (fresh or frozen) works perfectly and saves prep time. If using frozen, thaw it first and pat it very dry.
Q2: What if I don’t have a food processor?
A2: You can use a box grater with the large holes to rice the cauliflower manually. It takes a bit more effort but yields similar results.
Q3: How can I make this dish spicier?
A3: Besides Sriracha, you can add a pinch of red pepper flakes with the garlic and ginger, or incorporate fresh or dried chilies.
Q4: Can I add other vegetables?
A4: Yes! Feel free to add diced bell peppers, mushrooms, finely chopped broccoli florets, or spinach. Adjust cooking times based on vegetable density.
Q5: My cauliflower fried rice turned out mushy. What went wrong?
A5: This usually happens due to overcrowded pan, not drying the cauliflower enough, or cooking on too low a heat, which steams rather than fries. Ensure high heat, dry cauliflower, and cook in batches if your pan isn’t large enough.
Quick way to grow your Cauliflower Fried Rice in 5 steps
Ingredients
Equipment
Method
- Heat a large skillet or wok over medium-high heat. Add a tablespoon of cooking oil.
- Add the garlic and ginger, and stir-fry for 30 seconds until fragrant.
- Add the mixed vegetables and stir-fry for 3-5 minutes until tender-crisp.
- Push the vegetables to one side, crack the eggs into the empty space, and scramble until cooked through.
- Add the cauliflower rice to the skillet, along with the soy sauce and sesame oil. Stir-fry for 5-7 minutes, breaking up any clumps of cauliflower rice, until heated through and slightly browned.
- Stir in the chopped green onions. Serve immediately, garnished with Sriracha if desired.